Ammo
Use this section to keep a detailed inventory of your Ammo. Here is an overview of everything included:
Toolbar: At the bottom of the screen, there is a toolbar with the following items (from left to right):

- Archive List: view the Ammo you've added to the Archive.
- Shopping List: keep track of the Ammo you need to purchase
- Purchase Report: provides details on how much money you’ve spent on Ammo
- Sort: sort your Ammo by Caliber, Manufacturer, Bullet Type, and Favorites. To change the default sort option, go to the “Options” section and change the settings under “Ammo: Set Sort Default”
Top of the Screen: At the top of the screen, there are 2 buttons:
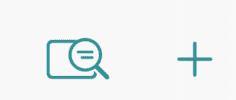
- Search: use this section to find Ammo -- you can view Ammo by Bullet Type, Caliber, Manufacturer, Location, and Last Used.
- Add Ammo: To add new ammo select the “+” button (top right).
Add Ammo:
When adding new ammo, you have the option to add as much or as little information about your ammo as you want. The only required field is the Caliber.
If you buy the same ammo over and over, you don’t have to create a new entry every time — instead, you can just add a Purchase Record for your existing ammo (see below for adding Additional Ammo).
Ammo Photo: Tap the ‘add photo’ button to add the main photo for your Ammo.
Save a Copy of your Photos: You have the option to save a copy of your photo to your Photo Library. There are two ways to do this:
- Option 1: After taking a photo, you will be given the option to “Save Copy to Photo Library”.
- Option 2: On the “Edit Details” screen tap the image, you will be given the option to “Save Copy to Photo Library”
Ammo Details Screen:
This screen shows you details about your ammo.
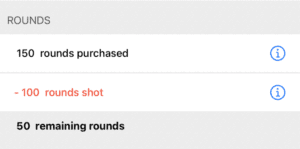
- If you added purchase information, you will be able to see the number of rounds you purchased.
- If you added a Range Report, there will be a section for “rounds shot” and “remaining rounds”.
Edit Details: To edit your ammo details, tap the “Edit” button (top right).
Photo: to view a full-size of the Ammo photo, tap on it.
At the bottom of the “Details” screen, there is a toolbar with a number of buttons:

- Delete Ammo (trash can): To delete ammo, tap the ‘trash’ button (bottom left).
- Range Report (target): To view Range Reports for this Ammo, tap the ‘target’ button.
- Action Button: the action button includes the following options:
- Add to Shopping List: add Ammo that you need to purchase to the shopping list,
- Save Details as PDF: this will create a PDF file with the details about your the Ammo that you can save to your Files.
- Move to Archive: move Ammo to the Archive that you no longer use.
Add Additional Ammo:
If you purchase a specific ammo more than once, you don’t need to add it again. You can add a purchase record to it.
To add a purchase record to existing Ammo:
- Go to the Ammo Section.
- Select the ammo from your Ammo List.
- Once you are on the details screen, tap on the row that shows the Purchase Details.
- You’ll be taken to a screen that lists the purchase details for that ammo.
- On the Purchases screen, you can add additional ammo by tapping the ‘+’ button (top right).
Edit Ammo Purchase Details:
- Select the ammo from the Ammo List.
- Once you are on the details screen, tap on the row that shows the Purchase Details.
- You’ll be taken to a screen that lists the purchase details for that ammo.
- On the Purchases screen, select the purchase you want to change.
- Tap the “Edit” button (top right) to edit the ammo purchase details, including the ammo quantity.