Instructions for Backing Up Data
I know it takes quite a bit of time to enter your data in the app, so I wanted to make sure you were aware of the different ways that you can back up your data.
In this article, I’m going to share 4 options (click on them or scroll down for the details):
OPTION 1: iCloud Backup
When using iCloud Backup, it’s important you follow all of the steps involved (and there is quite a few) — the app has no control over this process.
In order to make sure you have the most updated information, here is a link to the instructions on the Apple website:
- How to back up your iPhone or iPad with iCloud: https://support.apple.com/en-us/108366
- How to back up your iPhone, iPad, and iPod touch with your Mac: https://support.apple.com/en-us/108796
- How to back up your iPhone, iPad, or iPod touch with Windows: https://support.apple.com/en-us/108967
**RESTORE DATA: if you have an issue with the app, you will need to restore the data from your backup. Here are instructions from Apple:
- Restore your iPhone, iPad, or iPod touch from a backup: https://support.apple.com/en-us/118105
OPTION 2: File Sharing (also known as iTunes File Sharing)
Even if you’re backing up your data with iCloud, with your Mac or Windows, it’s helpful to keep a copy of the databases on your computer. That way, if you have an issue, you won’t need to restore your device from backup.
This also provides an extra safeguard in case you have an issue with your device or are unable to restore from a backup — you can also copy those files to a second device.
If you don’t have a computer or want an easier way — see Option 3.
The instructions for File Sharing differ slightly depending on what operating system you are using on your computer – here are links to detailed instructions from Apple.
- Using macOS Catalina or later: https://support.apple.com/en-us/119585
- Using a Windows computer: https://support.apple.com/en-us/120402
- Using an older version of macOS: https://support.apple.com/en-us/120403
Regardless of the method you use, it is important that you COPY ALL 3 DATABASE FILES.
** It’s important that you remember to periodically update the database on your computer, especially after an update, as you may experience an issue trying to use an old database with newer versions of the app.
Want your data on a second device?
You can copy the files from your computer to the second device.
- Drag/copy ALL 3 files from your computer to the myArmsCache folder on your second device. If it asks you if you want to replace the files already there, select Replace.
- Open the myArmsCache app. If you don’t see the items, completely close the app and reopen it.
*** WARNING *** Do not attempt to edit or modify the database files on your computer; doing so could cause serious issues and corrupt the data.
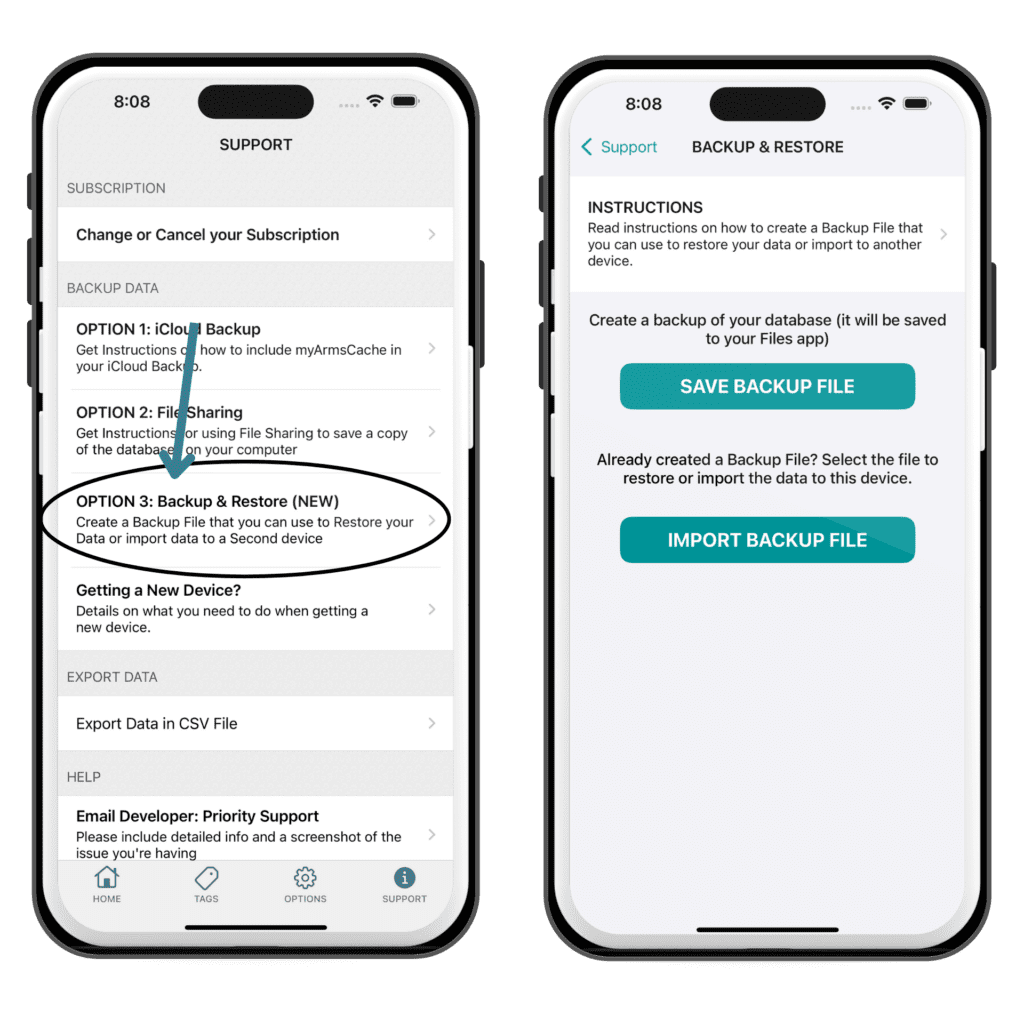
OPTION 3: Backup & Restore (NEW in Version 5.0.0)
I added this new option for people that don’t have a computer or want an easier way than File Sharing to move data to a second device.
When you use this option, you will create a backup copy of your database that will be stored in the Files app on your device.
You can then import that file to restore data (if you have an issue with the app) or to copy the data to a second device.
** Keep in mind that you will need to periodically replace the backup when I update the app, and after making changes to your data.
Here are the steps:
- Go to the Support Section of the app
- Select the row that says OPTION 3: Backup & Restore
Backup Your Data:
- Tap the “Save Backup File” button.
- After you do that, you will be taken to the Files app.
- DO NOT change the name of the file — the app requires the original name to recognize it during Import.
- Select a location for the File to be saved (you’ll want to make a note so you remember the location).
- Tap “Move” (top right)
- If there are no issues, you will get a notification that your Backup File has been saved.

Import Your Data:
- Tap the “Import Backup File” button on the Backup & Restore screen.
- An alert will pop up asking your to confirm that you want to import the data.
- Caution: when importing the data, the current data on your device will be deleted and replaced with the data in the file. This is not reversible.
- If there are no issues with importing the data, you will get a notification that the import has finished.
- If, for some reason, your data isn’t there when you check. Completely close the app and reopen it.
OPTION 4: CSV File
This isn’t a good option for backing up your data, as the data from the CSV File cannot be imported into the app.
But if you’ve decided to cancel your subscription, or just want to keep your data in a spreadsheet, then you can export your data as a CSV File.
The CSV file can be opened with a Spreadsheet Program, such as Excel or Numbers. The CSV File includes the data, but it does not include the photos.
Instructions:
- Go to the Support section of the app
- Scroll down and tap the row that says ‘Export Data in a CSV File.’
- You’ll then be taken to a screen where you can choose which data you want to export to a CSV File.
***IMPORTANT*** Although you can export your data in a CSV File, the app doesn’t support the option to import data from a CSV File. Please use one of the alternate backup options above.
